
IMO 1
Korean Natural Farming- “IMO 1”
IMO 1: Indigenous Micro Organisms
In Korean Natural Farming it is taught to collect indigenous microorganisms from our local environment and culture them for use into our garden beds and to our plants as a foliar spray. Collecting and utilizing the IMO’s will assist and encourage the re population of organisms in your soil for optimum soil health which in turn creates balanced, healthy plant growth and production.
Collecting IMO’s from you area is greatly encouraged because the organisms are already adapted to the climate and environment for maximum strength and efficiency, so basically no jet lag from these guys once their on the clock. IMO’s can also come from two different sources: bacterial and fungal. Bamboo patches and vermicastings can provide a bacterial environment and old growth forest can offer fungal.
It is also beneficial to make collecting, culturing, and applying IMO’s to your soil regularly. The consistency maintains an abundant living soil for all your plants to thrive in. Not only will it show to be beneficial to the plants but also contribute to a rich eco-system in your land.
Supplies Needed:
-Clean Rubbermaid storage Bin
-Clean small plastic “shoe box” style container
-Clean containers such as a large yogurt or cottage cheese container
-White rice
-Non Chlorinated water
-Cheese cloth
-String or bungee to secure cheese cloth to small container
-Castings from worms (contains bacteria)
(Note– there are many great videos and documents on how to collect IMO online however after experimenting with multiple ways here in the jungle, it shown to be too wet and damp which collected black mold along with fire ants infesting the process. The system below mimics an atmosphere that is contained and helps keep out the jungle moisture and mass amounts of fire ants.
The system is basically a dry, clean space (Rubbermaid Storage Bin) with the worm casting inside. The cooked rice will capture the bacteria contained in the casting and be able to populate in a clean, dry environment.
Recipe:
-Make “hard cooked” rice in rice maker. Hard Cooked rice is rice that is cooked to be as dry as possible, so you want to avoid making a moist or sticky rice. To make hard cooked rice you add no more that half the amount of water to rice.
Example: if you measure 3 parts rice you add 1.5 parts NON CHLORINATED water. Cook in rice cooker.
-Fill container (yogurt or cottage cheese container) with cooked rice loosely.
-Place the cooked rice container into the larger “shoe box” style container that contains collected vermi castings in the bottom. The castings contain the bacteria that will be captured and populated on the cooked rice. Cover this container with cheese cloth and string containing both casting container and cooked rice container.

-Both of these containers will be placed in the larger clean Rubbermaid storage bin which will act as the simulated clean, dry environment for the IMO’s to be created in.

-Place the Rubbermaid storage bin (with lid) in a very dry and shaded area. The dryer and cooler (meaning cooler for the jungle) the better.
-Check on the cooked rice container daily to monitor the growth of the IMO and to make sure it is not getting contaminated by moisture or bugs.
-When a fluffy white substance has spread over the cooked rice- the IMO is complete. Do not let it sit too long or it will develop other molds that will contaminate the pure IMO that you are aiming to capture.


NEXT STEP: GO TO “IMO 2”
IMO 2
Korean Natural Farming- “IMO 2”
IMO-2:
IMO 1 is the collection of the Indigenous Micro Organisms from your environment on the cooked rice (rice and microbes). IMO 2 is the fermentation process of the organism in a sugar source (rice, microbes, and sugar).
Supplies Needed:
IMO-1
Brown Sugar
Gloves
Small Container (no lid)
Cheese cloth with string
Recipe:
-measure out equal parts (1:1) brown sugar to the amount of rice and microbes (IMO-1) *estimating equal parts by sight is fine.

-mix the brown sugar thoroughly into the IMO1 with your hands (gloves recommended)


-mixture is complete when you can easily form a mass with the rice and sugar with your hands.

-cover the mixture with cheese cloth and string and let ferment for two weeks in a cool, dark, and very dry location.
(The microbes are developing by eating the sugar and fermenting. It was found beneficial to pick up the container and rotate it to mix it frequently during the fermentation process.)
-here in the jungle, ants are attracted to the sugar and rice, so we put a container inside a larger container with a few inches of water at the bottom. This keeps the ants from getting to the container.

STABALIZING IMO 2
Once IMO2 is complete in fermentation (2-3 weeks) it can be stabilized and stored for use.
Recipe:
-put finished IMO2 in a larger bucket.
-Add 3 times (1:3) amount of non chlorinated water to the IMO2.
-mix with wooden spoon or bamboo.
-strain out liquid mixture to remove rice and other particles.
-Finished strained IMO2 can be stored in bucket (with air lock) in a cool, dark place for up to one year.
Usage:
Finished IMO2 can now be used in soil and garden beds and sprayed onto plants as a foliar spray.
-use a ratio of 1:500 of the IMO2 to non chlorinated water in a sprayer to treat garden bed soil, compost piles, and foliar spray to growing plants.
(mixture can be made with all inputs at once to be sprayed)
-treating plants and soil should be done before the sun comes up. The plants pours are wide open in the dark and will consume the foliar spray versus in the sun when the pours are closed. Also spraying in the dark allows the microbes to softly enter the soil without getting fried and killed from the hot sun during application. These microbes are alive and direct, hot sunlight will kill them.
Confession


Same log- 6 months later
Activated EM-1
Activated EM-1
EM 1 is a product on the market that is a special blend of efficient/effective micronutrients. It was created by Professor Dr. Teruo Higa who also coined the words “effective micro organism” and trademarked “EM”.
EM 1 contains many co-existing micro organisms versus the “LAB” we create in Korean Natural Farming which only contain the lactobacillus culture. The major groups of micro organisms in EM 1 is lactobacillus, yeast, and phototrophic bacteria.
EM-1 can be used for a multitude of applications including compost piles, odor reduction, water treatments and ponds, foliar sprays, garden bed treatments, and livestock operations.
EM-1 can be pricy from the stores or distributers. There is a procedure to “extend” the amount of EM-1 to increase the volume. This procedure is called “Activated EM”. That does not mean the EM is not activated from it’s original bottle, I believe the term “Activated” was eventually preferred over “Extended”.
By Activating/Extending the EM-1 you can increase the volume by 20 times which brings the cost down to a fraction of the original price. When creating Activated EM-1 you need to allow time for the fermentation and gather supplies for the procedure.
Supplies Needed:
-EM-1
-Molasses
-Bucket/Buckets with lids
-Air locks (optional)
-non chlorinated water
-Cheese cloth and string
Recipe:
-Measure out the quantity of EM-1 that you desire to extend:

-Add equal part molasses. 1:1 ( EM-1: Molasses)
-Gently stir (wood/bamboo stick- not metal) in 20 parts non-chlorinated water. 1:20 (EM-1+Molasses: water)
-Let sit with cheese cloth fastened on top of bucket (without lid) for the first 24 hours to encourage some aerobic absorption.
-After 24 hours, secure on lids and airlocks to buckets for an aerobic fermentation process:

-store buckets in a dry, shaded space. Warmer temperatures is preferred for the fermentation process.
-Activated EM-1 is ready to use after 4 weeks of fermentation.
*****UPDATE!!!!*****
I have discovered that the information originally presented by EM 1 distributors about “Activating” EM has changed. The current information is listing that after adding the Molasses, the activated EM can be used in 4-7 days.
Further research has gathered that after adding the molasses and water for the “Activation”, the EM can be used immediately or within 4-7 days for the most active microbes. Additionally, the “Activated EM” should be completely used within one month.
Usage:
-Foliar spray: 1:500 – 1:1000
-Compost piles: 1:50- 1:100
-A few ounces can be used in grey water systems, down drains, and in septic tanks for odor control.
Confession

Coqui frog guarding his eggs
Air Locks and Pour Spouts
Air Locks and Pour Spouts:
Some of the inputs that you make from Korean Natural farming will require air locks for your buckets. Below is the procedure to easily make your own. It is also beneficial to attach pour spouts to your buckets to easily dispense the inputs for use.
AIR LOCKS
Supplies Needed:
-Buckets with lid
-Plastic beverage bottle with lid
-Plastic tubing
-Drill with “step drill” attachment
(or any tool that will make a hole the size of your tubing)
Step Drill Attachment:

Instructions:
-Drill one hole in your bucket lid and one hole on the top of your beverage container. The hole should be a very tight fit for the plastic tubing to fit through.

-Puncture a small hole at the top of the beverage bottle:

-Fill beverage bottle with water to just under the punctured hole level. Make sure the tubing goes into the water. The tubing coming through the bucket lid into the bucket however should not be immersed in any liquid.
-Secure lid on bucket tightly. Air will now travel from the bucket through the plastic tubing into the water of the beverage container.

POUR SPOUT
Pour spouts can be purchased online for $5.49 each at Midwest Home brewing and Winemaking Supplies:
http://www.midwestsupplies.com/homebrewing-equipment/bottling/spigots-bottling-buckets.html
I recommend the drum tap spigot as it did well without leaking.
You will also need a hole saw or a spade bit of the size of the pour spout to attach it to your bucket:


Confession

Water Soluble Calcium and Water Soluble Calcium Phosphorus
Korean Natural Farming- “WCA” & “WCP”
“WCA”: Water Soluble Calcium
“WCP”: Water Soluble Calcium Phosphorus
Korean Natural farming teaches us to make our own water soluble calcium and water soluble calcium phosphorus from simple ingredients that are easily found from your kitchen.
Calcium and phosphorus are important for our plant growth, health, pest and disease control.
In Korean Natural Farming it is beneficial to add these inputs during certain times of the plants development. Calcium is important during the beginning stages of the plant to assist its strong growth. Phosphorus is important during the “change over” period between vegetative cycle and flowering cycle.
Fungal disease and blossom end rot are also signs of calcium deficiencies.
Lack of Calcium also causes PH imbalances towards the acidic side.
The water soluble application also allows an easily absorbed source of nutrients to the plants immediately. This system can show to be superior to a powder form of calcium which requires a long process of breaking down into the soil until it is available for the plant to utilize.
Supplies Needed:
-Egg shells
-Vinegar (alive: homemade, apple cider vinegar, brown rice vinegar, etc.- No White or distilled)
-Large glass containers
-Cheese cloth and string
-Toasting mechanism: BBQ, Oven, Torch, Camp fire, Etc.
Recipe:
-Collect Egg Shells and rinse clean

-Prepare the way you are planning to “toast” your eggshells. This can be done on a BBQ, over a camp fire, or in the oven. We have access to a flame propane torch:

-Toast the eggshells:

-For Calcium only you want the eggshells to be toasted brown without the charred black. For Phosphorus you will want eggshells that are charred black:

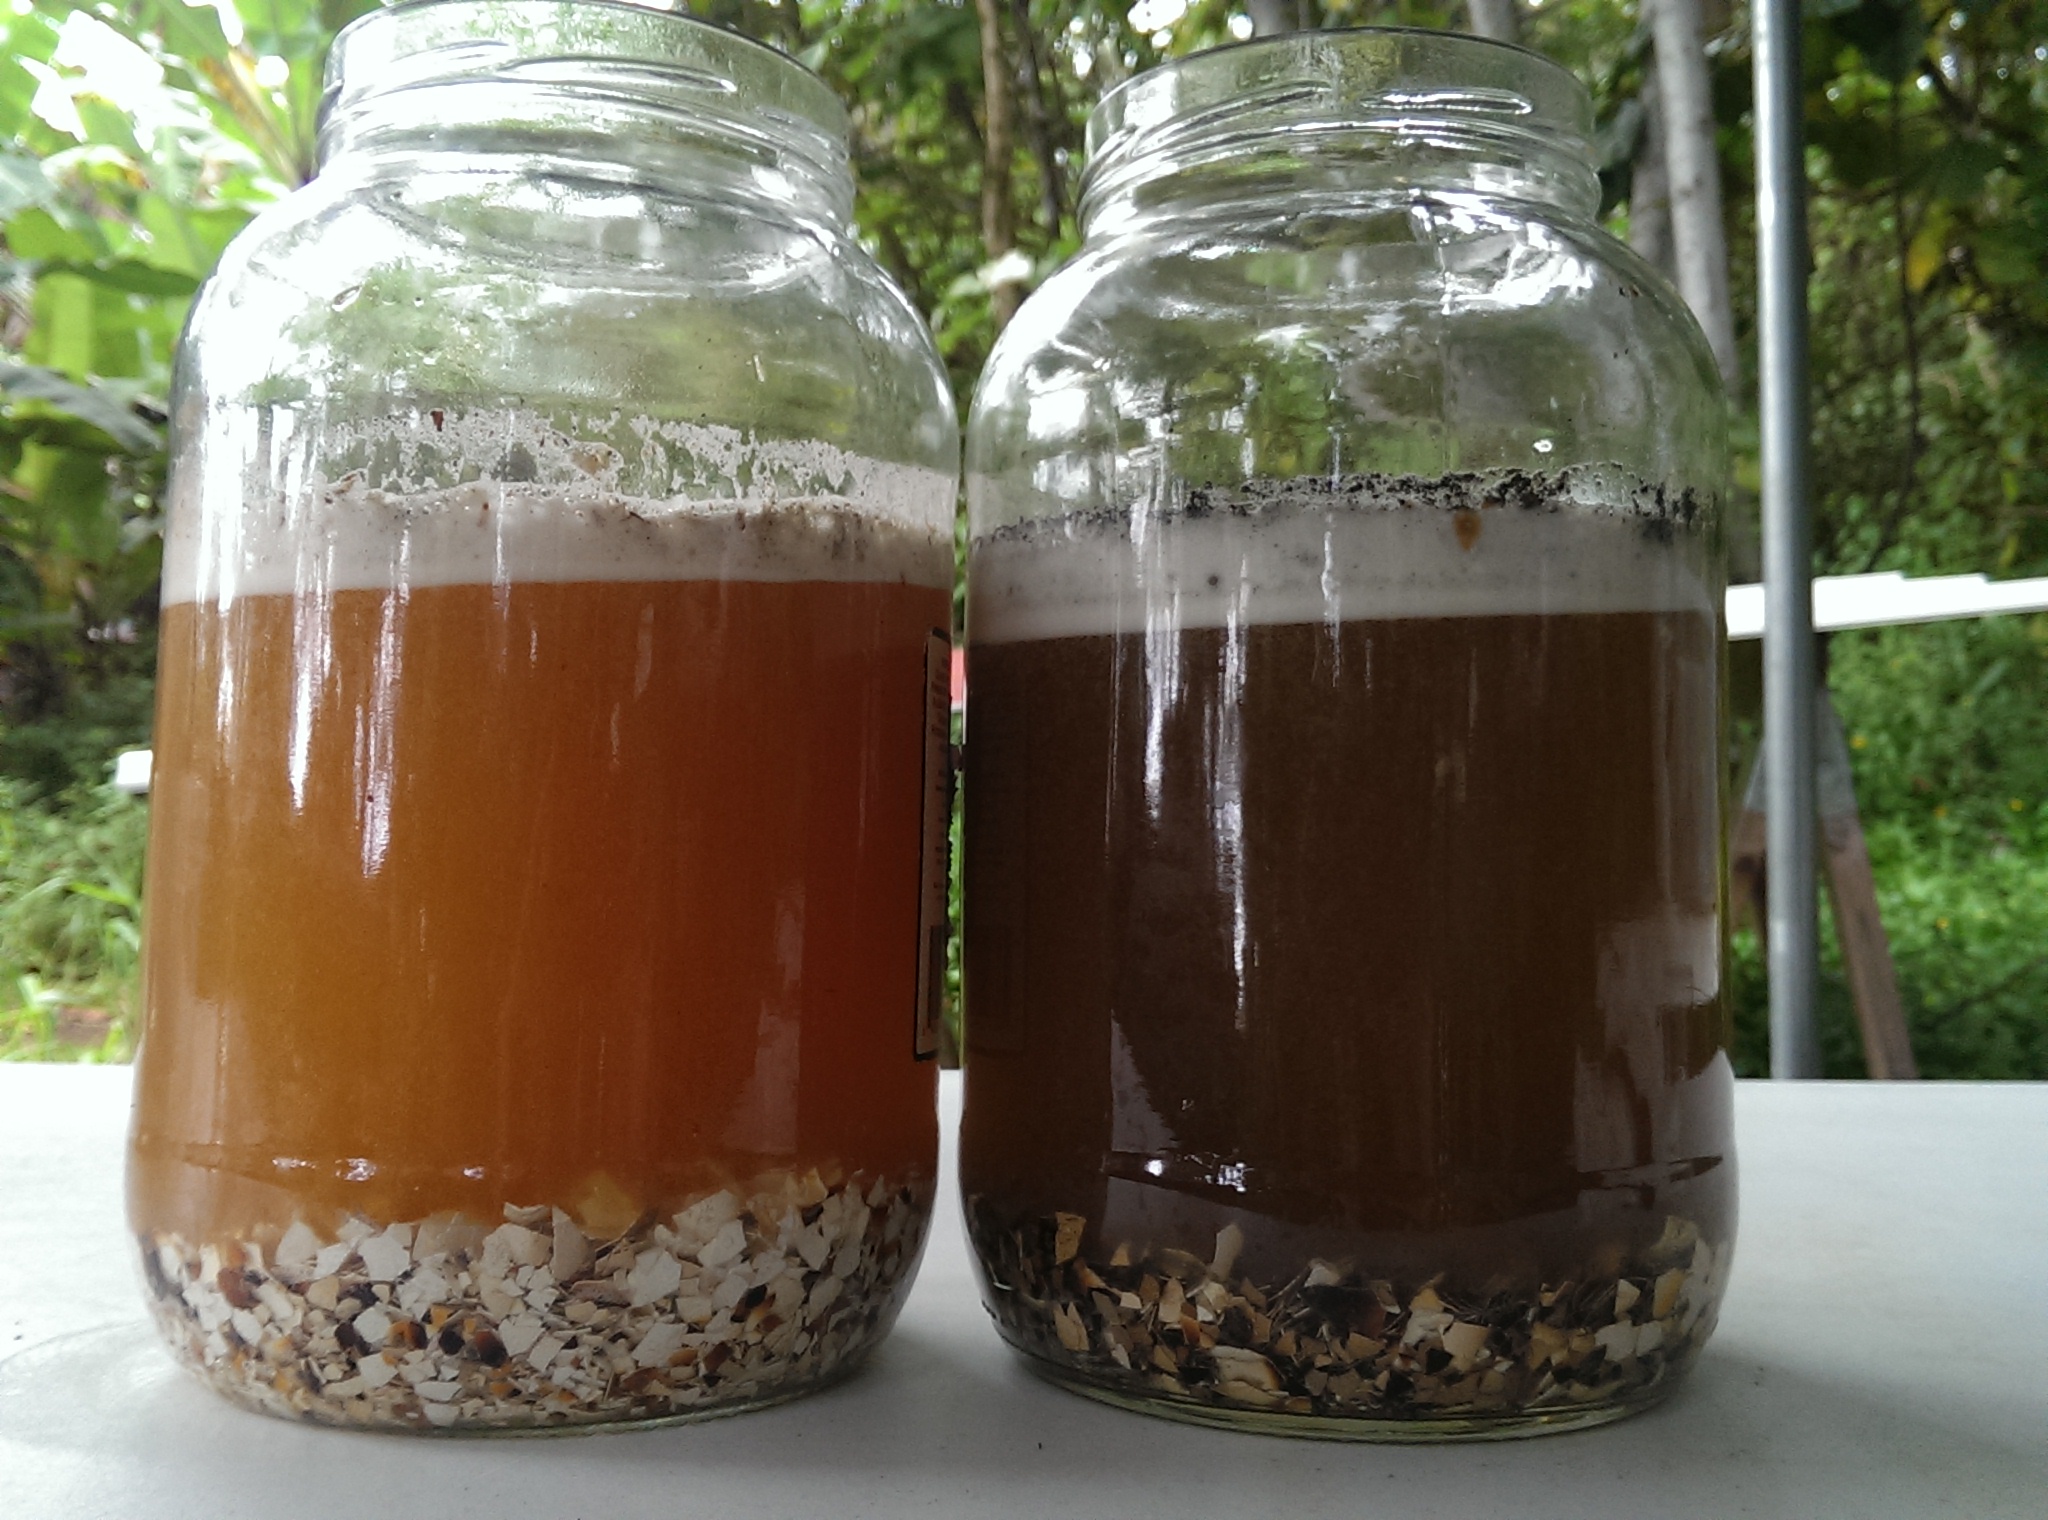
-These toasted eggshells will now be added to your vinegar. You need “alive” vinegar not white vinegar or distilled. You can make your own alive vinegar or buy apple cider vinegar with the mother culture. This is our homemade vinegar, one jar for calcium only eggshells and one jar for calcium/phosphorus eggshells:

-Add eggshells to vinegar: ratio is 1:10 (eggshells : vinegar) Add the eggshells slowly as the reaction is a fizzing and can get very active if added to fast all at once:

-Below is both WSC: Water Soluble Calcium (lighter) and WCP: Water Soluble Calcium Phosphorus (darker):
-Cover jars with cheese cloth and string and let sit in a dry dark space for at least 20 days. After 20 days you can add a small amount more of toasted eggshells to see if additional fizzing occurs. If so, the vinegar is able to still extract more calcium. If not, the vinegar is at its capacity for absorption.
-When finished, strain and store in glass jar with lid. Dispose of eggshells in compost pile.
Usage:
WSC and WCP can be used at a diluted ratio of 1:500 – 1:1000 to non-chlorinated water. This input can be put into a sprayer and used before sunrise as a foliar and garden bed spray. This input can be added with other inputs during spraying however should be stored separately.
Confession

